How to Set Up Your Variations in Amazon Seller Central
As you plan your variations, think about how your customer shops so the themes you choose are easy to navigate with content written specifically for each variation.
First things first: be sure to back up all your listings from Amazon in case something goes wrong with uploading the variations. In order to add variations to products, there are two options – using a product template or the Variation Wizard. The Amazon Variation Wizard allows you to create a parent-child relationship in bulk using an auto-populated inventory file template. Another option is the product template you can download from Amazon. You then upload your product variations in bulk using the inventory file template or Excel template to Seller Central.
Uploading Variations with Product Template
If you go to the “Variation Wizard” and click on “create a new family,” you’ll follow these steps:
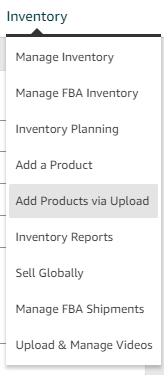
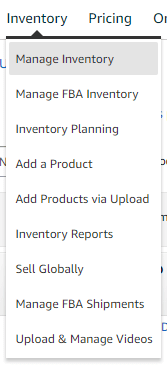
Step1: Log in to your Seller Central Account > Go to Inventory > Click “Add products via Upload” > And then download an inventory file
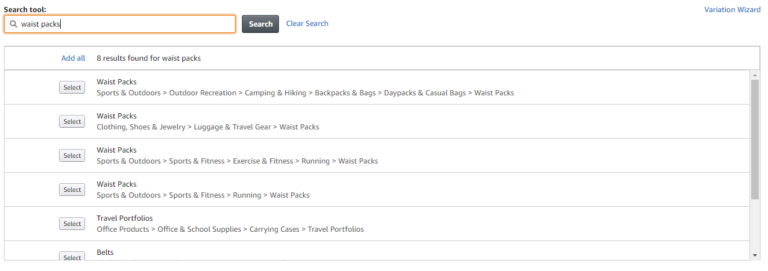
Step 2: Find your category
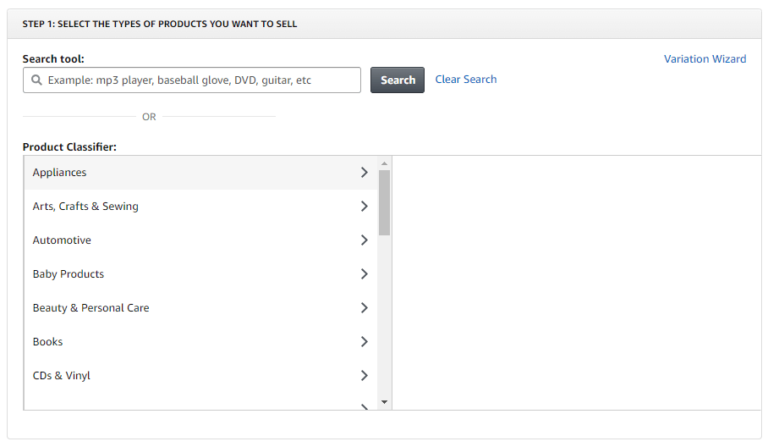
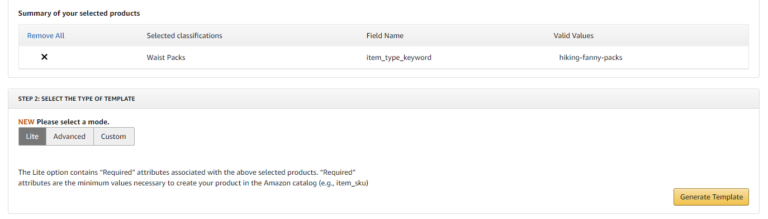
Step 3: Download your product template

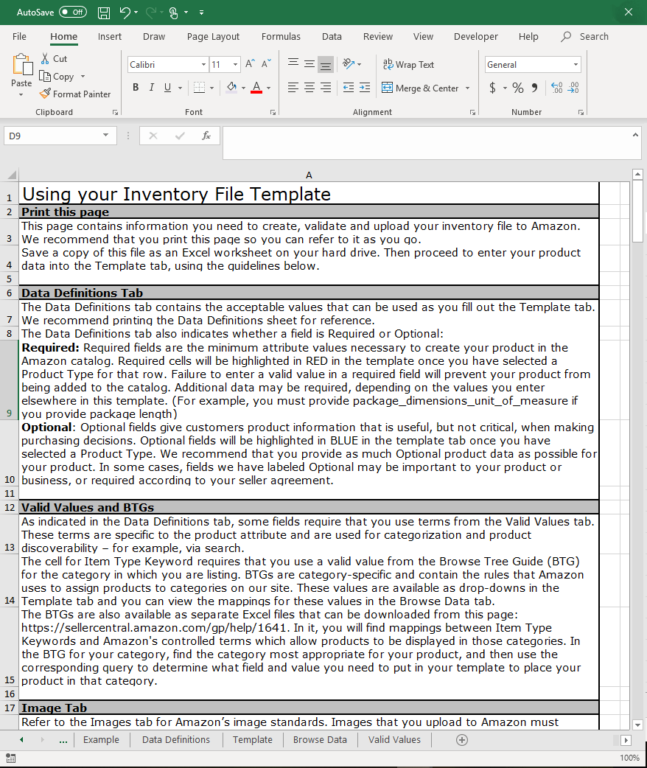
This is how your spreadsheet should look when you first open it in Excel:

Step 4: Follow the below for setting up your document
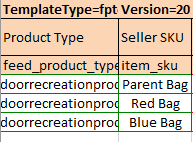
When filling out your Excel spreadsheet, make sure to select the following for “feed_product_type” and “item_sku” from the drop down menus.
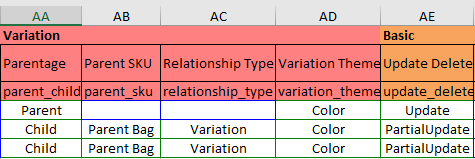
Set-up your “Variation” section of the document like so for “parent_child”, “parent_sku”, “relationship_type”, “variation_theme”, and “update_delete” in the Basic section.
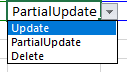
Reminder: Make sure to do a partial update when making future variation changes in your listing, as a complete update can possibly erase important information.
Tip for variation titles: If you do not have the option to name your variation “blue”, you can add a “.”, “~” or a “-” character to the end of the variation name. For example, if you were selling a red jacket with a blue zipper, but another seller already had that product with that variation, you could add a character to the name to help separate it from the existing variation by naming it “red with blue zipper-”.
Step 5: Instructions for parent and child item
*Note: Specific categories may not have specific “variation_themes”. It can vary so we suggest doing research for specific categories if you run into any issues or before trying to implement themes.
For Parent:– Type SKU
– Leave parent SKU blank
– Put “Parent” for parentage value, then add the variation theme you’ll be using
– Everything else should be blank, including relationship
– If this is a new parent, use “Update”
If you have an existing parent or are adding a variation to the existing parent, use “Partial Update”
For Child Item:– Enter required values (or if already existing, leave blank)
– Fill in the Parent SKU with the SKU you just made for the parent
– Put “child” in parentage, put “variation” in relationship type
– Variation Theme should be the same as the parent
– Add the variation item in the correct detail cell, such as color, size, etc.
– Put “Partial Update” for the existing items or you will overwrite all existing back-end data. This includes, but is not limited to: product descriptions, key feature bullets, reviews, etc.
Product Reviews
If you variate a product with another that already has reviews, don’t be alarmed if your product suddenly has 0 reviews. Amazon’s platform takes roughly 24 hours to update the reviews and merge them together for your listing.
If you want a certain product’s reviews to take over another listing you’re variating, you should make the product with the reviews the parent item. In that case, you’ll need to follow the same process for “Parent item” as above, but instead of making a new SKU:
– List the product’s SKU as the parent SKU for the variations
– Select “Partial Update” for the SKU – So, SKU should be existing SKU
– Parentage should be Parent
– The relationship is blank
– Parent SKU should be blank but fill in the “Variation Theme” and “Partial Update”
Keep in mind that this process may only work for some product categories because others don’t allow it.
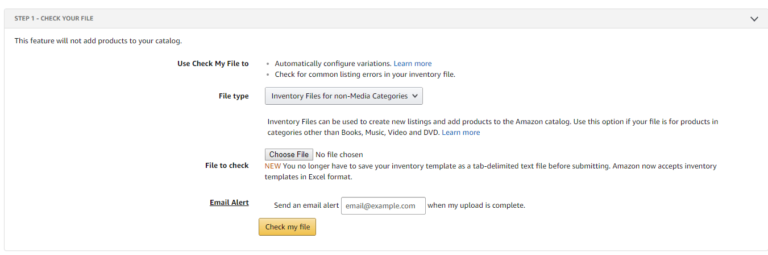
Step 6: After you’ve reviewed everything, save your file and go back to the inventory upload page. Go to “Check and Upload your Inventory File” >

It is recommended to “Check Your File” first because Amazon will alert you if there are any missing required fields or if you filled out something incorrectly. You’ll be able to download an error report and see what needs to be changed.
Step 7: Then “Upload” file > the inventory file template or Excel file works >
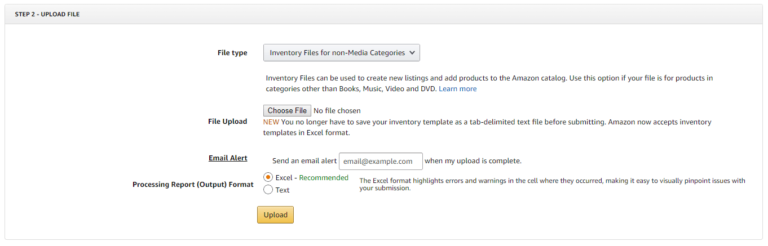
It will take a few minutes to an hour to upload, depending on how many items were in your sheet.

It may take an additional hour or so to show a change in your inventory.
Uploading Variations with the Variation Wizard
If you have an item that is already designated as a parent SKU, you can use the “Variation Wizard”.
Step1: Go to “Add a Variation” on the “Manage Inventory” tab.
Step 2: Search for the parent ASIN. If you cannot find it, try going to your inventory and click on “Edit” for the parent SKU, then go to the variation tab, and fill out the information there.
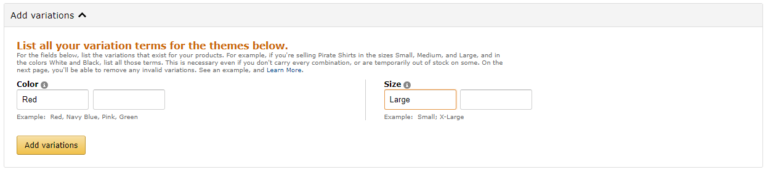
Step 3: For your theme, fill out the information related to your product, for instance, “black with blue zipper” works if you are selling a hoodie.
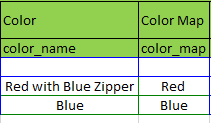
Step 4: Then, fill out the “Color Map”, put the SKU you want to be a child, and add the product ID/ID type the listing uses in your inventory, as well as the condition, price, and quantity. You can just copy these values from your listing page for the SKU.

Typical errors with “check my file”:– Missing category
– Brands don’t match
– Previously variated
Tip: Be sure to use a new value (white, white & black, etc.)
By setting up your product variations with one of these two methods, inventory file template upload or Variation Wizard, you are well on your way to improving the performance of your Amazon listings along with your customers’ experience!